Raspberry Pi 2 with HannStar 10.1″ TFT LCD & HDMI Adapter Review
Viewing Angles
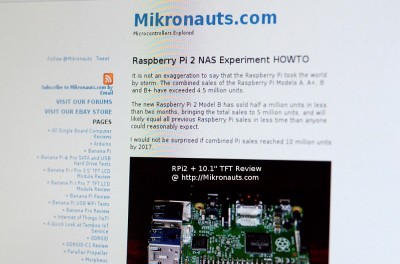
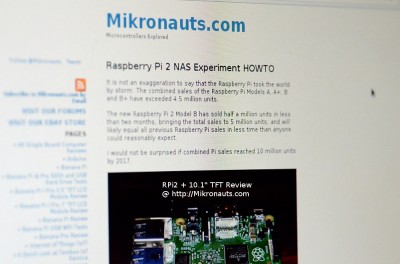
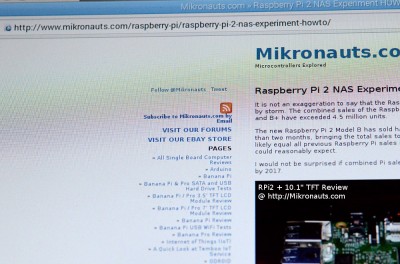
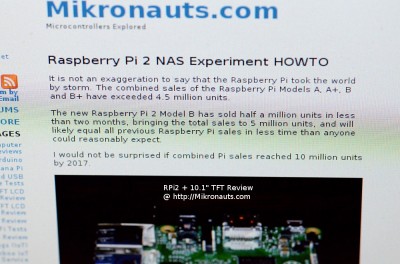
Please note: Part of the screen looks out of focus due to depth of field of the lens, the display was in sharp focus to the eye, and looked much better than the photos below.
Here I took a shot from roughly 45′ looking to the right:
(click on image for larger version)
Now from roughly 45′ to the left:
(click on image for larger version)
Now from roughly 45′ up at the display:
(click on image for larger version)
Now from roughly 45′ down at the display:
(click on image for larger version)
I had no problem at with the display at 45′ angles, it was sharp all around.
Power Consumption
Here is what the vendors say about power consumption for the combination of LCD panel and HDMI to LVDS adapter board:
| Power Supply Voltage | Power Consumption |
| 5V | 980mA |
| 6V | 780mA |
| 7V | 660mA |
| 8V | 575mA |
| 9V | 515mA |
| 10V | 450mA |
| 11V | 415mA |
| 12V | 380mA |
I decided to measure the actual power consumption, at 50% brightness and 100% brightness using a 1.5A 12VDC adapter.
The brightness setting for the panel did not seem to make a noticeable difference in the power consumption of the LCD panel and adapter board.
| Brightness | 50.00% | 100.00% |
| LCD off | 50mA | 50mA |
| LCD on, no signal | 390mA | 370mA ** |
| LCD on, boot text | 410mA | 420mA |
| LCD on, idle desktop | 420mA | 420mA |
* All current measurements above were taken from the 12VDC adapter used
** LCD without signal using less power at 100% brightness? Weird, but that is what I measured.
If you power the adapter (and thus LCD) from 6V, expect the current consumption above to double.
The power consumption was a bit higher than the vendor’s table suggested, however the difference was not huge.
Conclusion
The HannStar 10.1″ IPS TFT LCD display with a Realtek 2660H based HDMI/VGA/Video to LVDS adapter board is a fantastic display for a Raspberry Pi – or any Pi really.
Depending on your budget, and comfort level with buying from overseas (Ebay etc) vs. buying from North America (for example Adafruit), you can get a similar kit for somewhere between $80USD-$145USD which is not bad at all for such a gorgeous display.
The display is razor sharp, the viewing angles were excellent, and the colours were vibrant.
The adapter board has plenty of inputs, and worked well. Sure, it would be nice if it was not necessary, and if all we had to run was a single flex cable to a panel, but as we can’t do that, this combination will work for a lot of applications.
The display basically uses close to 5W, which is not bad in my opinion for a display this large, with such a flexible adapter board.
The Good
- Gorgeous display
- 10.1″ looks HUGE compared to a 7″ display
- 1280×800 is way better than 800×480
- multiple inputs allow you to connect a VGA source and two video sources in addition to your Pi
- mounting tabs on the LCD panel
The Bad
- all those fiddly cables
- screen is easily scuffed, “use a screen protector Luke”
- having to separately mount the adapter board
The Ugly
- all those wires! (good thing I have some really short HDMI cables)
Related Articles
- Raspberry Pi with EastRising 4.3″ TFT HDMI module Review
- Raspberry Pi 2 Model B Review
- Raspberry Pi 2 NAS Experiments & Howto
- Raspberry Pi 2 USB hard drive and adapter tests
- Raspberry Pi Analog to Digital Conversion Experiments and Howto
- Raspberry Pi I2C 4×4 matrix keypad with MCP23017 and Python
- Raspberry Pi 1602 and 2004 LCD interfacing
- Elf RoboPi/Raspberry Pi Robot
- Raspberry Pi Model A+ Review
- Raspberry Pi Model B+ Review
- Banana Pi / Pro 3.5″ TFT LCD Module Review
- Banana Pi / Pro 7″ TFT LCD Module Review
Article Index
- Introduction, Specifications, IPS TFT LCD Display
- HDMI Adapter Board, Raspberry Pi 2 Desktop
- More Screen Shots, Macro Shots
- Viewing Angles, Power Consumption, Conclusion


