HexPi – Hexapod Pi Robot
April 12, 2014
I do not want to power the servo tester from a wall-wart, so I went on an archaeological dig in my lab…
Success!
I found my two 7.2V RC battery packs and chargers; I will use them to power the servos for now. Later I will probably switch to two 18650’s in series.
I’ll power RoboPi from a nice “USB Charger” battery pack.
RoboPi can control 16 (actually 24 with care) servos directly, but it only has eight analog inputs, without adding a multiplexer or another ADC.
Last night I had a great idea – I will use the thumb sticks switch between two sets of servos for control!
Joystick analog pin map for RoboPi
AIN0 – js0 X axis – servo on P0 and P8
AIN1 – js0 Y axis – servo on P1 and P9
AIN2 – js1 X axis – servo on P2 and P10
AIN3 – js1 Y axis – servo on P3 and P11
AIN4 – js2 X axis – servo on P4 and P12
AIN5 – js2 Y axis – servo on P5 and P13
AIN6 – js3 X axis – servo on P6 and P14
AIN7 – js3 Y axis – servo on P7 and P15
Joystick button digital pin map for RoboPi
P20 – js0 toggles servo P0&1 vs P8&9
P21 – js1 toggles servo P2&3 vs P10&11
P22 – js2 toggles servo P4&5 vs P12&13
P23 – js3 toggles servo P6&7 vs P14&15
(Edit: fixed incorrect digital pin map)
I had to re-order the servo cables for the thumb switches, as yesterday I had them going right-to-left, instead of left-to-right for the joysticks analog inputs.
Heck, I can always change them both left to right later simply by changing how the assorted cables are plugged in!
I am leaning towards getting my servo tester running before I resume assembling HexPi, I think it will save me a lot of time.
April 11, 2014
I’ve decided to make my own servo tester using a RoboPi and some joysticks. It will let me calibrate the legs far more quickly, as I am not happy with the calibration I’ve achieved so far.
Yesterday I calibrated the “starboard” legs without mounting the bottom plate of the chassis, and I noticed that at full travel, the legs would bang on the bottom place – and stress the servos. Not good.
After fixing the calibration on the starboard legs, I will calibrate the port legs.
I’ve decided to adopt naval terminology instead of “left side” and “right size” as HexPi should be able to walk backward just as easily as forward. Or sideways 🙂
Update #1
I’ve taken some photos, and uploaded the best two shots. I have to set up my light box again so I can take better shots.
My “better mousetrap” servo tester is coming along nicely, it should be running tomorrow. I took the time to make a styrene base for it, and securely mount the controls. I can already see many additional uses for it.
Update #2
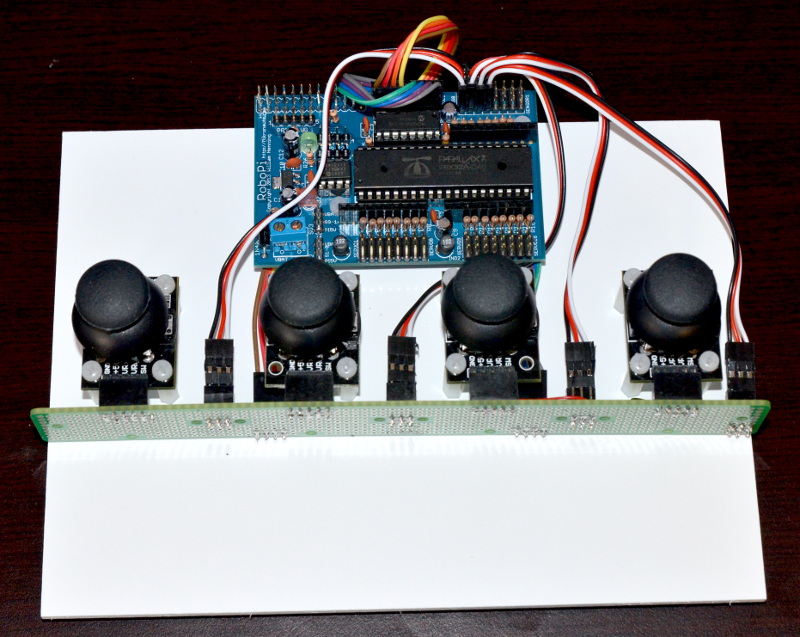
And here is a “work-in-progress” photo of the “better mousetrap” servo tester I am making:
(click on the image to see a larger photo)
The RoboPi and the joystick modules are mounted on standoffs, which are mounted on the white sintra board.
Each joystick goes to two analog channels, and the “hat” pushbutton of each joystick goes to digital inputs – you can think of it as a 12 channel controller.
I’ll probably rotate RoboPi so that the 16 servo connectors are at the top of the board, and add some sort of LCD to the top of the board to show current servo pulse values.
Maybe some more switches and blinking lights too 🙂
April 10, 2014
I managed to assemble all the pieces, and get three legs mounted and roughly calibrated with a servo tester.
What I learned:
1) Putting such a chassis together involves a LOT of screws and nuts. A ridiculous number. Sort the screws/nuts by type first.
2) I should have ordered some metal sevo hubs – I’ll have to take HexPi apart in the future to upgrade his hubs.
3) NOT to let my finger be caught between the chassis and one of the legs – OUCH – those 11kg/cm servos are more than enough to try to crush fingers.
4) A single channel servo tester is not so great for trying to calibrate multiple legs.
